Rabu, 29 Desember 2010

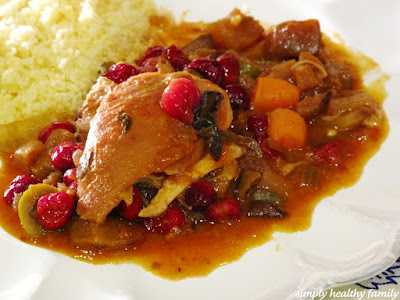
Chicken Tagine with a Twist!


Some days I have to work a very long 12 hours. A 12 hours in a busy O.R. that wipes me out. A 12 hours that isn't as easy to recover from as it used to be. These are the days that cooking is the very last thing I want to do at the end of the day. Eating a hot, home-made dinner however, is just what I do need. Dilemma.

Crock Pot to the rescue! I keep most of these ingredients stocked in my pantry and only had to pick up some chicken thighs as we have been really limiting chicken lately for various reasons (read more about this life changing decision in my post/rant here). Also, I have been trying to not eat meat for dinner since IMO it isn't good for your body to be digesting meat while you sleep. Meat takes several hours of hard work for your GI system to digest and disrupts sleep.

Chicken Tagine is a classic Moroccan dish made several in several yummy variations but usually with the spices ginger, cumin, coriander, cinnamon, paprika and turmeric.  Tajines are slow-cooked stews braised at low temperatures, resulting in tender meat with aromatic vegetables and sauce. The best thing about Chicken Tagine is that you can throw in any combination of your favorite ingredients such as dried fruits, nuts, olives, veggies, preserved lemon, honey ect. and as long as you use the classic base of spices and tomatoes you've got yourself a Moroccan Delight!

I love my veggies and so I threw in some diced eggplant along with my olives, dried apricots and fresh cranberries. *On a side note, I don't think I will use fresh cranberries next time as they were pretty tart, or maybe I'll just use less to compliment the other flavors without over powering them.


A pretty Tagine pot is on the top of my wish list. I use a 'crock pot' for now ;)


The traditional tajine pot is formed entirely of a heavy clay, which is sometimes painted or glazed. It consists of two parts: a base unit that is flat and circular with low sides, and a large cone or dome-shaped cover that rests inside the base during cooking. The cover is so designed to promote the return of all condensation to the bottom. With the cover removed, the base can be taken to the table for serving

Recently, European manufacturers have created tajines with heavy cast-iron bottoms that can be heated on a cooking stove to a high temperature. This permits the browning of meat and vegetables before cooking.


PRINT THIS RECIPE
Ingredients


2 tablespoons olive oil

8 skinless, boneless chicken thighs, cut into 1-inch pieces

1 eggplant, cut into 1 inch cubes

2 large onions, thinly sliced

4 large carrots, thinly sliced

1/2 cup dried cranberries

3/4 cup chopped dried apricots

1/2 cup green olives, sliced

2 cups chicken broth

2 tablespoons tomato paste

2 tablespoons lemon juice

2 tablespoons all-purpose flour

2 teaspoons garlic salt

1 1/2 teaspoons ground cumin

1 1/2 teaspoons ground ginger

1 teaspoon cinnamon

3/4 teaspoon ground black pepper

1 cup water

1 cup couscous


Directions:
* Searing the chicken before adding it to the crock pot is important to lock in flavour.

Heat olive oil in a skillet over medium-high heat. Place the chicken pieces and eggplant in the heated oil; stir and cook until the chicken is browned on all sides but not cooked through. Remove the skillet from the heat.

Place the browned chicken and eggplant on the bottom of a slow cooker. Layer the onion, carrots, cranberries, and apricots over the chicken.

Whisk together the chicken broth, tomato paste, lemon juice, flour, garlic salt, cumin, ginger, cinnamon, and ground black pepper in a bowl. Pour the broth mixture into the slow cooker with the chicken and vegetables.

Cook on Low setting for 8 hours.

Bring water to boil in a saucepan. Stir in couscous, and remove from heat. Cover, and let stand about 5 minutes, until liquid has been absorbed. Fluff with a fork.

PRINTER FRIENDLY VERSION


  I'm sending this over to Potluck Fridays at eKats Kitchen!
 

Kamis, 23 Desember 2010

Veggie Might: Eat Tamari Almonds!

Written by the fabulous Leigh, Veggie Might is a weekly Thursday column about all things Vegetarian.

Almonds are my go-to healthy, everyday snack that picks me up when I’m fading in the afternoon and gives me a boost without filling me up before a workout. Does that sound like copy for an Almond Board ad? Forgive me; I’ve been pulling some crazy hours at an ad agency these past few weeks.

However, it’s true what I said about almonds. I love them and eat them all the time, in teeny little handfuls of 24 almonds because 24 almonds is an ounce, and an ounce is a serving, and a serving is what a Reasonable Person shoves in her mouth when she needs a snack before her blood sugar crashes.

When I’m unreasonable, I eat several servings which equal several ounces which equal at least 96 almonds and sometimes more. But I forgive myself because I could be eating that many potato chips or ginger cookies, which are my true weaknesses.

My recent almond of choice has been the tamari variety, roasted in soy sauce. They are right there in the bulk bin next to the raw almonds that I’ve loved for so long. I was skeptical at first. They must be roasted in oil, I thought, not appropriate for everyday snacking. Not so! Only soy sauce, says the ingredients list on the bin. They’re a skosh cheaper than the organic raw almonds too, at $6.99/lb vs. $7.99/lb.

But when I find giant bags of plain raw almonds for less than $2.50/lb at the Indian market in Queens, that $1 savings doesn’t seem like so much. What better way to feed this new tamari almond addiction?

To the Interweb machine...and in less than 15 seconds I had a recipe from no less than Gourmet via Epicurious.

Insanely easy to make, I whipped up batch of tamari almonds while I watched the first bit of Max and Mary, a darkly funny and poignant animated movie about an Australian girl who becomes the “pen friend” of a 40-something New York City loner. I snorted from laughter and tears. Get thee to Netflix.

Right. Almonds. Tamari almonds. So good. I can’t stop eating them, still by the teeny handfuls, but with greater frequency. I’m trying to save some to go with the other fancy nuts I made for Christmas company. But they are so easy and fast, I will make more if I have to. I will probably have to.

~~~~

If these recipes tickled your fancy, you may also enjoy:
~~~

Tamari Almonds
16 servings
adapted from Tamari Almonds, Epicurious: Gourmet, December 2006


16 oz raw or dry roasted almonds, with skins (about 3 cups)
1/4 cup tamari (wheat-free soy sauce)
1/4 tsp demerara or turbinado sugar

1) Preheat oven to 300°. On a baking sheet, spread out almonds evenly and bake for 15 minutes.

2) In a large, heat-proof mixing bowl, combine tamari and sugar. When almonds are ready, pour into bowl and stir for five minutes.

3) With a small strainer or slotted spoon, transfer almonds back to baking sheet and toss out the extra liquid. Bake 20–25 minutes, stirring once about halfway through baking time, until almonds are dark red on the outside and light golden on the inside.

4) Cool about 20 minutes before serving to your face.

Approximate Calories, Fat, Fiber, Protein, and Price per Serving
164 calories, 14g fat, 3.25g fiber, 6g protein, $.19

Note: Your cost may vary wildly depending on the price of almonds.

Calculations
16 oz raw roasted almonds: 2592 calories, 224g fat, 48g fiber, 96g protein, $2.72
1/4 cup tamari: 32 calories, 0g fat, 0g fiber, 4g protein, $0.24
1/4 tsp demerara sugar: 3.75 calories, 0g fat, 0g fiber, 0g protein, $0.02
TOTALS: 2627.75 calories, 80g fat, 224g fiber, 96g protein, $2.98
PER SERVING (TOTALS/2): 164 calories, 14g fat, 3.25g fiber, 6g protein, $.19

Rabu, 22 Desember 2010

Guest Post: New Year's Spiced Chickpeas with Avocado

Jaime Green writes our bi-weekly Green Kitchen post. She's guesting for Wednesday. Happy holidays!

Last New Year's Eve, my boyfriend and I had been dating for about two months. Not big fans of subway rides home in the wee hours alongside the inevitable puking revelers (though I guess that's better than facing drunk drivers on the roads), we decided to stay in.

I showed up at his apartment that night with two bottles of very cheap champagne (I love you, Andre) and a sparkly paper top-hat. I blew a noisemaker when he opened the door. I'd gotten the hat and noisemaker at the dollar store on my block about an hour before.

We didn't have any big plans – drink cheap champagne, pause whatever movie (okay, old episodes of Star Trek: the Next Generation) to watch the ball drop – but we also didn't have any dinner plans at all.

He lived at the edge of a predominantly Mexican neighborhood in Brooklyn, with none of the trendy bistros and bars we associate with that hip little (big) borough. I was ready to cook for us, but it was already 9pm and the supermarket ten blocks away was already closed. And it's not like this bachelor apartment was so well-stocked with provisions.

There was a lot of this:

Me: I'll cook something. What do you want?
Him: I don't know.

Eventually we got to “chickpeas.” I never thought of myself as a big fan of chickpeas (unless they're mushed to death in hummus), but between that secret ingredient – hello, Iron Chef: Sunset Park – and my sense of what we might be able to round up from some nearby bodegas, a plan started to form.

I knew plenty of Harlem bodegas that stocked some fresh produce, and although things were a little more sparse, we managed quite well, and ended up with, if I do say so myself, one of the tastiest things I'd ever made.

I suppose this is one of the reasons I prefer cooking to baking, aside from wanting to surround myself with tasty vegetables rather than cookies. You can't improvise baking. Measurements and proportions are vital when you're trying to go from flour to cake. But cooking doesn't require a recipe. You can go with an idea and your knowledge of what works, and when you surprise yourself with the outcome it's not necessarily a bad thing. That sort of ingenuity and self-sufficiency is exciting and, dare I say it, empowering.

I'm not saying these chickpeas are why my boyfriend and I are still together, but they certainly haven't hurt.

(A note on nutrition here: This recipe is higher in fat than most “healthy” recipes you see around. But I would make a case for fat, as would a lot of scientific research. The low-fat, high-carbohydrate diets of the 80s and 90s did no one any favors. Fat is important for many aspects of health, from mood regulation and vitamin absorption to nice skin and feeling full after you eat. Fat is only a problem in that it is very calorie-dense, but that's more dangerous in processed foods with a higher fat content than you realize. For me, at least, a higher-fat diet really eases my junk and sugar cravings. There's some more good reading about fat here: Confessions of a Former Lipidphobe. Although this recipe gets about half of its calories from fat, it is relatively low in carbohydrates, and none of those are processed, and it's got a good dose of protein and fiber as well. The fats are good ones, and most importantly, this dish is delicious and keeps you full for hours.)

Spiced Chickpeas with Avocado
Serves 3


4 teaspoons olive oil, divided
1 large red onion, chopped
1 can chickpeas, drained and rinsed
1 avocado, diced
A couple handfuls of cilantro, chopped (about ¾ cup chopped)
Juice of one lime
1/2 teaspoon salt, divided
3/4 teaspoon cumin
1/2 teaspoon hot paprika
Black pepper, to taste

1) Heat 2 teaspoons oil in a large sautee pan over medium heat. Add onions and 1/4 teaspoon salt. Stir and cook slowly for 20-25 minutes, until onions are just about done to your liking. (You can go slowly and caramelize them, or turn up the heat and go faster for crispier onions, however you like.)

2) When the onions are just about done, stir in chickpeas. Add cumin, paprika, a few grinds of black pepper. (Add the spices gradually, and taste as you go.) Add 1-2 teaspoons more oil as needed – you don't want this dry – and more salt, to taste. Cook until chickpeas are soft and creamy, 10-15 minutes. Adjust seasonings as needed.

3) Turn off heat and stir in avocado, cilantro, and lime juice.

4) Serve as-is, or over rice or in tortillas. Crumbled queso blanco makes a lovely addition.

Approximate calories, fat, fiber, protein, and cost per serving
313 calories, 33.6g fat, 9.6g fiber, 21.5g protein, $0.92

Calculations
4 t olive oil: 168 calories, 18.7g fat, 0g fiber, 0g protein, $0.16
1 large red onion: 96 calories, 0.2g fat, 4.1 g fiber, 2.6g protein, $0.30
1 can chickpeas: 428 calories, 4.1g fat, 15.8g fiber, 17.8g protein, $0.89
1 avocado: 227 calories, 21g fat, 9.2g fiber, 2.7g protein, $0.89
½ cup chopped cilantro: 1 calorie, 0g fat, 0.1g fiber, 0.1g protein, $0.25
juice of one lime: 8 calories, 8g fat, 0.1g fiber, 0.1g protein, $0.20
½ t salt: 0 calories, 0g fat, 0g fiber, 0g protein, $0.01
¾ t cumin: 7 calories 0.3g fat, 0.5g fiber, 0.3g protein, $0.02
½ t paprika: 3 calories, 0.1g fat, 0.4g fiber, 0.2g protein, $0.02
¼ t black pepper: 2 calories, 0g fat, 0.1g fiber, 0.1g protein, $0.01
TOTALS: 939 calories, 100.8g fat, 28.8g fiber, 64.6g protein, $2.75
PER SERVING (TOTALS/3): 313 calories, 33.6g fat, 9.6g fiber, 21.5g protein, $0.92

Selasa, 21 Desember 2010

Ask the Internet: Canned Tuna Ideas?

Today's question comes from reader Jessie:
Flickr's aMichiganMom

Q: I was wondering what to do with my cupboard full of canned tuna besides tuna salad or casserole. Thoughts?

A: Jessie, that is a most excellent question. The Kitchn had an excellent post about canned tuna options back in 2009, though my personal favorite is Herbed Tuna in Tomatoes, an easy, no-cook alternative to those omnipresent sandwiches.

Readers, what do you do with canned tuna?

Want to ask the interweb a question? Post one in the comment section, or write to Cheaphealthygood@gmail.com. Then, tune in next Tuesday for an answer/several answers from the good people of the World Wide Net.

Senin, 20 Desember 2010

Guest Post: Chestnut and Bulgur Stuffing, a.k.a. Holiday Time with the Man Who Discovered Food Has Calories

Miriam Isserow is a fundraising consultant based in Silver Spring, Maryland. In her misspent youth, she loved to make dessert. Now she likes to cook delicious and healthful meals.

This time of year, we seem to go from one food-centric event to another. This is a particular challenge for my dear husband, otherwise known as The Man Who Discovered Food Has Calories. I know my new nickname for him is a mouthful, so from here on in, I'll call him TMWDFHC.

I recently mentioned to TMWDFHC that for our own holiday meal, I would make a bulgur stuffing instead of our traditional bread stuffing. Years ago, my cousin whipped up a similar dish that I still remember—and given the dieting and monitoring of cholesterol we’ve been doing at my house, I thought it would be a great alternative to soaking bread with eggs.

But when I told TMWDFHC I would be doing a bulgur stuffing, he flipped out.

“How can you make stuffing without chestnuts?”

You see, one core principle in our house is that stuffing has chestnuts. I assured TMWDFHC that the bulgur stuffing would have chestnuts, too.

So, I found some bulgur stuffing recipes, added chestnuts and played around a little. This was the result. You can make it in the turkey, or, if you're expecting vegetarians or happen to live with someone who discovered that food has calories, you can bake it in a pan. An additional healthful plus: You don’t have to grease the pan as you would with classic stuffing.

Chestnut & Bulgur Stuffing
Serves 12

2 ½ c water,
2 oz. dried porcini mushrooms (around 2 cups)
1 oz. dried morel mushrooms (around 1 cup)
2 tbsp. olive oil
1 chopped medium sized onion
5 ½ c. broth
2 ½ c. bulgur (it’s good if it’s coarse but it really doesn’t matter)
1 c. flat leaf parsley, chopped
1 cup shelled chestnuts (use a freeze dried package that you can buy at an Asian market for next to nothing).

1) Bring water to a boil. Pour over mushrooms and soak for half an hour.

2) In a 4 quart sauce pan or chefs pan, sauté onion in olive oil until softened. Add broth and bring to a boil. Stir in bulgur and cook around 8 minutes more, uncovered.

3) Remove mushrooms from water, squeezing if necessary. Reserve soaking liquid, strain, and set aside. Rinse mushrooms and coarsely chop.

4) In a large bowl, toss together bulgur, ½ cup of the reserved liquid, mushrooms, chestnuts, parsley, and salt and pepper to taste. Let cool completely.

5) Now you can either stuff it in a turkey or bake it. If you are baking it in a pan, no need to grease the pan—and bake it at 325 for 40 minutes, covered.

NOTE: Our custom is to use some as stuffing and some in a pan for the vegetarians (using vegetable broth in that case). After all, even those who have discovered that food has calories and who are trying to be really good through the holidays are entitled to the divine taste of chestnut stuffing with turkey drippings.

Minggu, 19 Desember 2010

Sun-Dried Tomato Polenta with Lentil Putenesca

To my surprise, I have not gained any weight through this Holiday Season! Despite the fact that I've been to several parties with food a plenty and everyone at work brings in boxes and tins of goodies into work every day for weeks now, I've managed to not put on a pound! ........ *Oooooo's and Awwwww's inserted here.
Truthfully, I don't feel as good as I normally do which probably has to do with the occasional snacking on sweets and that I've been insanely busy and haven't been exercising regularly. I am however really being good about still making good, healthy home made foods most every day.

Breakfast: Either my Simple Chilled Gazpacho, Keifer smoothie w flax, berries and orange peel or a scrambled egg with veggies.

Lunch: Salad, salad, salad. Eat your veggies. I have a variety of salads with a small amount of lean meat.
I've been taught to eat a small amount of meat at lunch time and NOT at dinner. Meat takes several hours to digest and IMO your body shouldn't be working to digest a bunch of meat while your immobile and sleeping. Also, beans and legumes as well as potatoes actually promote a restful sleep.

Dinner:  A Light Vegetarian meal. Sometimes I add Chicken broth to things for flavour and nutrients, but mostly we eat vegetarian for dinner. Beans, lentils, brown rice, whole grains and of course, veggies! I have lots of simple recipes as examples on my blog. Click "What's For Dinner" picture on my right hand side bar.


This Lentil Puttenesca is one of my favorite simple and healthy dinners.


I can not believe I have never had Putenesca. It was one of those dishes that when you taste for the first time, you don't know how you ever lived without it. It is so simple to make too.

I always have a bag of soft sun-dried tomatoes as well as cans of anchovy fillets in the pantry for adding flavour to simple dishes. Anchovies are one of those foods that I never thought I would I would eat. Ever. I love fish but Anchovies always grossed me out. My uber healthy mom eats them straight out of the can and to make matters worse, for breakfast even!
*gag

In her defense, they are very good for you. An excellent source of essential Omega's which promote vascular and mental health.

 I do however love anchovies as a flavour enhancer in pastas and dressings.  This was actually a surprise discovery when we went to a wonderful Italian restaurant in Downtown Phoenix called Pasta Bar. I ordered some pasta dish and loved it so I asked the chef what was the wonderful taste I couldn't figure out. To my surprise, Anchovy was one of them! Now I'm hooked.

I came up with this simple Lentil Puttenesca recipe and you MUST try it, even if your an anchovy hater from way back! Trust me, would I lie to you?


TIME  15 MINUTES     SERVES 6

You Will Need: For Polenta

3 cups unsweetened Almond Milk ( can use reg. milk or water)
1/2 t Kosher salt

1 cup Polenta (corn grits)

1-2 T butter

1/4 cup Parmesan

1/4 cup sun dried tomatoes, chopped


Directions:
In large pot over high heat, bring almond milk and salt to boil. Gradually stir in cornmeal and sun dried tomatoes. Reduce heat to simmer, cook 12-18 minutes or until very thick. Stir frequently with long handled spoon to avoid sputters.
When very thick, remove from heat and stir in butter and Parmesan. Pour into a buttered 9x9 casserole dish. Let it sit off heat for about 10-15 minutes to set, will be creamy.

TIME   40 MINUTES     SERVES 6 
For Lentil Putenesca:
 
1 cup mixed lentils
 
1 cup water or broth
 
1/4 cup olive oil


1 cup finely chopped yellow onion

6 cloves minced garlic

2 (28-ounce) cans Roma plum tomatoes, chopped, with juice

1 cup  pitted and sliced green olives (other olives will work as well)

2 tablespoons tomato paste

2 tablespoons drained capers

2 tablespoons minced anchovy fillets (about 8 fillets)

1 teaspoon dried crushed basil

1-2 teaspoon dried crushed red pepper flakes


Directions:

Rinse lentils thoroughly under cool water. Preferably, soak lentils for 6-8 hours before cooking to reduce phytic acids.
In a large pot heat the olive oil over medium high heat. Add the onion and saute until soft and lightly caramelized, about 6 minutes. Add the garlic and cook an additional 2 minutes. Add the water, tomatoes and the remaining ingredients and simmer until the sauce is thickened and slightly reduced, about 30 minutes. Adjust seasoning, to taste, cover and set aside.

Serve with Creamy Sun-Dried Polenta.

PRINTABLE VERSION OF THIS RECIPE!


Kamis, 16 Desember 2010

Veggie Might: Last-minute Substitution - Oatmeal Apple Cookies

Penned by the effervescent Leigh, Veggie Might is a weekly Thursday column about the wide world of Vegetarianism.

This week, I planned to present you with an alternative to the Christmas cookie, as well as one of my favorite sweets: daifuku, Japanese rice balls stuffed with sweet red bean paste. Three tries ended with me covered in sticky, gelatinous goo.

Let’s just say my technique needs work.

Time was ticking when I decided to scrap the daifuku. My baker’s pantry is still pretty well stocked from Thanksgiving, so cookies seemed like the best choice for a quick and dirty replacement. I turned to the dependable and consistently marvelous How to Cook Everything Vegetarian by Mark Bittman.

Bittman’s How to Cook Everything books take the guesswork out of cooking and baking by showing you how to customize recipes for any situation. If you’re a novice or by-the-book cook, you’ll feel at liberty to make substitutions to suit your tastes or pantry, and you’ll eventually gain the confidence to switch things up on your own.

One recipe reminded me of my mom and I just had to try it: Oatmeal Apple Cookies.

My mom was always trying to get me and my siblings to eat healthy snacks when the rest of our friends and classmates were eating ding dongs and zingers. Oatmeal Apple Cookies are just the kind of cookies she would have made to put in my Muppet Movie lunch box next to the carrot sticks and carob-chip trail mix.

So, at least for today, think of me as your wacky, veggie aunt, offering you whole-grain and fruit cookies when everyone else has laid out chocolate-coated, butter-infused treats rolled in nuts and dripping with icing.

I made a ton of changes, based on MB’s variation ideas and some based on my own preferences. He provides a vegan option for most of the recipes in the vegetarian cookbook, and I used his applesauce-for-egg and almond milk for cow’s milk suggestions. I also used nonhydrogenated vegan butter for dairy butter.

Here’s where I ventured out on my own: the original recipe calls for dried apples. I’m not a fan of dried fruit in general and don’t keep it around, so I took a chance and used the real thing. I also swapped granulated sugar for maple syrup. Excellent decisions all around.

The cookies are moist, sweet, and delicious. They may be a little on the soft side —no crispy edges, my favorite part of a cookie—but full of apple flavor and definitely a crowd pleaser; CB, my Roommate, and two of my officemates gave thumbs-up.

The recipe whipped up quickly too, from peeling and grating the apple to pulling the last pan out of the oven, the whole enterprise took less than 90 minutes. Oatmeal Apple Cookies would add a tasty and fast, if not entirely festive, option to the Christmas cookie rotation. And they’re much less sticky than daifuku.

~~~~

If this xx tips your canoe, swim on over to:
~~~

Oatmeal Apple Cookies
Makes about 4 dozen; 2 cookies per serving


1/2 cup nonhydrogenated vegan butter
1/2 cup maple syrup
3/4 cup brown sugar, packed
1/4 cup apple sauce
1 1/2 cups all-purpose flour
2 cups rolled oats (not quick oats)
1 cup apple, peeled and grated (about 1 medium apple)
1/2 tsp cinnamon
1/4 tsp nutmeg
1/4 tsp clove
pinch of salt
2 tsp baking powder
1/4 cup soy, almond, or rice milk
1 tsp vanilla extract

1) Preheat oven to 375. Peel and grate apple and set aside.

2) In a large mixing bowl, cream together vegan butter, syrup, and sugar with mixer, then stir in applesauce.

3) In a medium bowl, combine flour, oats, apples, cinnamon, nutmeg, clove, baking powder, and salt.

4) Alternately, add milk and dry ingredients to butter and sugar mixture until dough is formed, mixing in a little more milk if dough is too dry.

5) Spoon out tablespoon-sized dollops of dough onto ungreased baking sheet and bake for 12-15 minutes. Allow to cool for a minute or two, remove from baking sheet, and continue on a wire rack.

6) Serve with a glass of almond milk or hot tea.

Approximate Calories, Fat, Fiber, Protein, and Price per Serving
137.3 calories, 3.8g fat, .9g fiber, 1.74g protein, $.23

Calculations
1/2 cup nonhydrogenated vegan butter: 800 calories, 88g fat, 0g fiber, 0g protein, $0.96
1/2 cup maple syrup: 420 calories, 0.5g fat, 0g fiber, 0g protein, $2.38
3/4 cup brown sugar: 628 calories, 0g fat, 0g fiber, 0g protein, $0.43
1/4 cup apple sauce: 51.75 calories, 0g fat, 1g fiber, 0g protein, $0.26
1 1/2 cups all-purpose flour: 682.5 calories, 1.5g fat, 4.5g fiber, 19.5g protein, $0.32
2 cups rolled oats: 609 calories, 9g fat, 16g fiber, 22g protein, $0.24
1 cup apple: 77 calories, 0g fat, 2g fiber, 0g protein, $0.50
1/2 tsp cinnamon: 0 calories, 0g fat, 0g fiber, 0g protein, $0.02
1/4 tsp nutmeg: 0 calories, 0g fat, 0g fiber, 0g protein, $0.02
1/4 tsp clove: 0 calories, 0g fat, 0g fiber, 0g protein, $0.02
pinch of salt: 0 calories, 0g fat, 0g fiber, 0g protein, $0.02
2 tsp baking powder: 4 calories, 0g fat, 0g fiber, 0g protein, $0.04
1/4 cup almond milk: 10 calories, 0.75g fat, 0.25g fiber, 0.25g protein, $0.12
1 tsp vanilla extract: 12 calories, 0g fat, 0g fiber, 0g protein, $0.26
TOTALS: 3294.3 calories, 90.75g fat, 21.75g fiber, 41.75g protein, $5.59
PER SERVING (TOTALS/24): 137.3 calories, 3.8g fat, .9g fiber, 1.74g protein, $.23

Rabu, 15 Desember 2010

Green Kitchen: Local Going Into Winter

Green Kitchen is a bi-weekly column about nutritious, inexpensive, and ethical food and cooking. It's penned by the lovely Jaime Green.

Ignore the fact that it's snowing outside-- Wait, don't ignore that. Take a moment to enjoy that. It's snowing! But ignore it in terms of the point I'm about to make.

Ignore the fact that it's snowing. Ignore the fact that it's about 50 degrees in my apartment, that I'm wearing sweatpants and a hoodie and my hat. Ignore the down comforter on my bed, the cold toes, the date on the calendar.

How do I know it's winter?

Let's take a look at what's recently come out of my kitchen. Breakfast Sunday: an improvised take on what I remembered of Kris' Shaksouka – canned diced tomatoes, half an onion, a carrot, and eggs poached therein. Lunch today (and for the rest of the week, and taking up some space in the freezer): lentil soup made with dried lentils, canned tomatoes, frozen spinach, and an onion. Breakfast tomorrow's looking like a smoothie with frozen cherries and blueberries.

Where have all the fresh veggies gone?

Winter is rough on lots of people – the sun's gone, it's hard to spend time outside, and winter coats are uncomfortable and bulky. Snow is lovely and sweaters are cozy, but this time of year can bring your mood down. (I always wish, walking past Christmas decorations in December, that our holiday of sparkly lights took place a few months later, when even the snow is dreary and we could really use a little extra glitter.)

Winter's an extra downer for local eaters, though. I'm not even a 100% locavore. Not at all - I love bananas and avocados and cans of coconut milk. I do appreciate the environmental and economic repercussions of shopping at the farmers market, but I keep doing it because I love how it feels. Meeting farmers, knowing where my kale comes from. Even just the ritual of the market – walking between stalls, comparing produce, and the week-to-week cycle of the growing season. From asparagus to tomatoes to butternut squash, that's how the year goes.

But now we've, like we do every year, come to the end. The farms are mulched over and resting for the winter, and just about every night brings a freeze. We have a few more weeks of the real hardy stuff – kale and leeks and Brussels sprouts – and food that stores well lasts a little longer. Apples and onions and winter squash stick around basically until springtime at the year-round greenmarkets (so do bison meat and eggs). But the growing season is drawing to a close, and with it goes a big part of what I love about cooking.

From Flickr's stevendepolo
So many of my culinary decisions in the warmer months are based on what I find at the market – radishes are cheap or the parsnips look nice, and I get inspired and try something out. (Maybe this is just a relief from my usually agonizing decision making process.) But in winter I don't think I get down cause the food's not local – the problem is that, for the next five months, all of the food is the same. Cheap and mediocre at my local supermarket, or pricier and lush at the Whole Foods downtown, it's shipped in from wherever, in-season in California or Chile or Taiwan, and nothing changes from one week to the next.

What do you do when your local veggies dry (or freeze) up? Do you come up with new, slightly less local, guidelines? Maybe food from your country, or hemisphere, rather than a 300-mile greenmarket radius? Maybe I can let sales direct me in winter the way the seasons do the other half of the year. Do you transition to canned and frozen foods? Canned tomatoes beat fresh ones seven months out of the year, and frozen kale – flash-frozen when it's fresh – is looking mighty good, and cheap, compared to the produce section at Whole Foods.

I've got my freezer supply of mashed cauliflower and apple sauce, and there's always room for soup in there, too, but it's not enough to make it through until spring. What's most important about how you choose where to get your food? Is it price, convenience, localness, or just the experience of it all? And how do you make the second-best choice feel good?

Selasa, 14 Desember 2010

DIY~ Children's Tea Towel Aprons

I've been looking for cute, affordable aprons for Jack and Nolan, my 4 and 5 year olds, for some time. They love to help me in the kitchen almost as much as they love personalized gifts. I was in JoAnne's Fabric last week and saw what I thought were children's apron's. As I  unfolded one and looked closer I found that they were actually cute little tea-towels for the Holiday's. The bottom of each towel was trimmed with  gathered fabric making them look like aprons to me. Each towel had a different embroidered Christmas picture on it and so I grabbed the cutest ones and set off to sew my boys and
my nieces some aprons for their Holiday Cookie Baking!

This defiantly falls into the " If I can do it, Anyone can do it" category. Sewing is NOT my forte'! This took me all of an hour to make 4 aprons and that's with baby Mona 'helping' me........


So here is a little photo tutorial I put together to show you how simple it is,
and how cute my son's and nieces are! ;)


1. Find cute Holiday Tea-Towel's on sale for $1.99 at craft store.


2. Turn towel over, fold down top to create desired length.
Fold over sides to make a steep triangle.
Iron


3. Sew along very top edge.


4. Sew 1"-2"  from the side of apron, leaving enough room to slip in your ribbon.


5. Slip ribbon into slot (just an inch or two) and sew on securely.
Sew ribbon onto the sides of the apron.
I found it helpful to have my 4 year old nearby to measure the lengths for the ribbons.


6. Embroider names on chest of apron. You could also use iron-on letters.


Voila! Aren't they cute?


I sent them to my adorable nieces in New York just in time for Holiday Cookie Baking!


My boys couldn't wait to put on their Christmas Baking Aprons and make Peppermint Chocolate Cookies!

Ask the Internet: Healthy Study Snacks?

Today's question comes from college student Caitlin, who has finals coming up.

Q: What about healthy study snacks? i think i ate my weight in popcorn yesterday and definitely need an alternative!

A: Caitlin! Having been a carouser of the late-night cafeteria scene (read: mozzarella sticks, pizza, something called "broccoli cheesebake"), I understand your delicate, frommage-craving pain. You'd like something filling, but light. Tasty, but not time-consuming. And if it's caffeinated, all the better.

This sounds lame, but fruit was always a good bet to start, with coffee acting as my beverage of choice. Energy drinks weren't so popular back in 199X, but I might have avoided Monster and its ilk like a florescent green plague.

How about some all-natural granola bars? Or trail mix? Or, when all else fails, hummus, carrots, and pita will work wonders.

But I hand it over to you, sweet readers. What snacks will help Caitlin ace her semester-end tests?

Want to ask the interweb a question? Post one in the comment section, or write to Cheaphealthygood@gmail.com. Then, tune in next Tuesday for an answer/several answers from the good people of the World Wide Net.

Jumat, 10 Desember 2010

Oatmeal Apple-Pecan Breakfast Cake


This is going to be our new Christmas morning breakfast tradition, it's that good and that easy.
This apple-pecan breakfast cake was absolutely delicious and with zero added sugar! Toasting the oats and pecans really add a wonderful old-fashion home-made quality. The baked apples were sweet and perfect.

 My 5 year old comedian Jack said "This apple cake tastes just like heaven!" ;)


Toasted Whole Grain Oats ( We love Coach's Oats brand)
Can you see the difference between these whole grain oats and 'quick oats'?


Simple


You Will Need:

1 cup toasted pecans

2-3 granny smith apples, peeled and chopped

1 cup whole-wheat (whole grain) flour

1 cup oat flour + 1 TBSP for sprinkling on top (I toast Coach's Oats in oven and grind in food processor)

1 tsp baking powder
1/4 cup flax meal
½ teaspoon kosher salt

1 tsp ground cinnamon  + 1 tsp for sprinkling on top

1 tsp vanilla

1/4 cup Earth Balance (or butter), melted

1/2 cup pure maple syrup + 1 tbsp

1/3 cup unsweetened applesauce


Directions:
Toast oats and pecans (separately) in 400F oven for 12-15 minutes. Remove from oven. Grind oats into flour using a mill or food processor.
Turn oven down to 350F. Peel and chop the apples. Grease a small casserole dish and then spread 1 tbsp of maple syrup on the bottom of dish. Now, spread a layer of chopped apples followed by a layer of pecans on the bottom of dish. Use just less than half of both the apples and pecans.
In a large bowl, mix the following dry ingredients (whole wheat pastry flour, Oat flour, baking powder, kosher salt, cinnamon).  In a small bowl mix the wet ingredients (applesauce, 1/2 cup maple syrup, vanilla, and 1/4 cup melted Earth Balance (or butter). Mix. If to dry, add a couple tablespoons of water.

Add the wet to the dry and mix well. Now spread on a layer of this batter over top of the apples and pecans. Use about half of the batter.

Now spread a layer of apples and pecans again, making sure to leave at least 2-3 tbsp of each for the top of the cake. Follow this by a final layer of the cake batter (use all of it up). Spread as evenly as possible.

Now sprinkle on the remaining apples and pecans. Mix a bit of oats with tsp of cinnamon and sprinkle all over top. Place in the oven for 55 mins at 350F. Allow to cool for at least 15 minutes before serving.


I'm sending this over to Hearth 'n Soul and also Bella Vita Blog Hop's!
hearthandsoulgirlichef

Kamis, 09 Desember 2010

Butternut Squash Souffle with Sauteed Collard Greens

Follow my blog with bloglovin


I came across this recipe for butternut squash souffle in Cooking Light Magazine and couldn't think of a better way to use the squash sitting on my counter. I've never been in love with souffles in general, foamy eggs are not my thing. I did however want to try my hand at the art of souffle. This was so much better than I expected! A very mild butternut squash flavour with just a hint of nutmeg on your taste buds as an afterthought (I added the nutmeg to the recipe)  The texture was perfect, light and creamy and I thought that it resembled more of a creme brulee than a souffle'.  I was in heaven! It's a good thing all of the kids loved it too so I could actually savour each and every bite while I patted myself on the back for actually cooking a perfect souffle with 4 kids running around. It didn't poof up as a souffle made entirely of eggs but it divine I tell you, D-vine!

In all honesty, it was far simpler than I thought. I do suggest baking the squash well in advance, especially if you have children. Thankfully, for once, I had the foresight to stick the squash in the oven around 2 p.m. It took almost an hour to cook then I set it on the counter to cool for a bit while I leisurely did other things around the house and the rest of the prep-work for dinner.

I threw together a quick collard green and black eyed pea saute to accompany the souffle and it was a wonderfully light and flavourful dinner.


* TIPS: I suggest using a blender of food processor to blend the squash mixture instead of a hand held or stand mixer so it will be as blended and smooth as possible.
Also, like I mentioned before, this recipe is not a lot of work but the baking time is lengthy. Don't rush yourself,  make sure you bake the squash well ahead of time, it will sit on the counter and wait for you. It is easier to scoop out the flesh when it's a bit cooled also.


I doubled this recipe to feed my family of 6 and had a small amount of left overs for baby Mona and the little boys the next day.


TIME   90 MINUTES TOTAL    SERVES 4-6
Ingredients


1 butternut squash (about 2 3/4 pounds) to yield about 2 cups pulp


1/2 cup 1% low-fat milk


1/3 cup (1 1/3 ounces) shredded fontina cheese


1/4 teaspoon salt


1/4 teaspoon Nutmeg


1 large egg


1 large egg white

Cooking spray
8 cups finely chopped Swiss chard or collard greens
1 cup cooked or 1 can black eyed peas.
3 cloves garlic, minced
2 cups water

* Note, I don't have a small souffle dish so I used my medium casserole dish.
Preparation


Preheat oven to 375°.


Cut squash in half lengthwise; discard seeds and membrane. Place squash halves, cut sides down, on a baking sheet; bake at 375° for 45 minutes or until tender. Cool. Scoop out pulp from shell. Set aside 2 cups pulp, reserving remaining pulp for another use.


Combine  squash pulp, milk, and next 4 ingredients (milk through egg white) in a food processor; process until smooth. Pour into 1-quart souffle dish coated with cooking spray. Place souffle dishes in a 9-inch  square baking pan; add hot water to pan to a depth of 1 inch. Bake at 375° for 40 minutes or until puffy and set.


While squash is baking, heat oil in a deep saute pan or dutch oven. Add garlic cook for 1 minute, add greens cook 2-3 minutes more. Add 2 cups water and 1/2 teaspoon salt and let simmer for 10 minutes. Serve immediately.


PRINT THIS RECIPE!


My make-shift souffle dish sitting in a dish of water ready to be put into the oven and
make my house smell wonderful.


Unpretentious, non-poofy sweet souffle.


Served with quick side of Collard Green and black-eyed peas.


I'm sending this over to Hearth and Soul for 'Food prepared from scratch, seasonal and healthy'.

hearthandsoulgirlichef

Veggie Might: Getting in the Mood with Sweet Potato and Swiss Chard Soup

Written by the fabulous Leigh, Veggie Might is a weekly Thursday column about all things Vegetarian.

Happy last day of Hanukkah, friends! Hope you had a super week plus one.

Gentle Readers, though I live on Holiday Island, USA (not to be confused with Christmas Town, USA—just down the road from my folks’ place), and I was sick for most of Hanukkah, I’m just not feeling it—it being the holiday juju that’s supposed to filling my heart with magic.

Thanksgiving was so delicious and festive; and I want Christmas to be the same. But if I start getting into the holiday mood too soon, I’ll be over it by the time Christmas actually gets here. To avoid holiday burn out, I refuse to decorate, shop, or cook anything holiday related until December 12. Even that is pushing it, but I don’t want to be anywhere near a retail outlet on Christmas Eve either.

In the meantime, I’ve been on the lookout for recipes that use seasonal vegetables but don’t have cinnamon, clove, or pumpkin pie spice. A few clicks around the Internet machine and tada! Yellow Split Pea Soup with Sweet Potato and Kale at one of my favorite recipe blogs, Fat-free Vegan Kitchen.

This is the recipe I’ve been dreaming about—clearly, since I didn’t have to buy a single ingredient to make it. I swapped out the kale for a gorgeous, emerald bunch of Swiss chard chilling in my crisper and made the easy substitution of toor dal (split pigeon peas) for yellow split peas.

For a minute, I thought this recipe was going to be too easy and it would only take me the 30 minutes of prep and 60 minutes of relatively inactive cooking (occasional stirring) time to make. But I had to take it a step further.

The recipe calls for curry powder which, after a few introductory lessons in Indian cooking, gives me pause. I’ve stopped keeping it around, opting to use whole spices instead. However, my imaginary friend and mentor Madhur Jaffrey shares a recipe in World Vegetarian for her own every day curry powder (called My Curry Powder). So I whipped up a batch.

Within minutes, my apartment was filled with the aromas of cumin and coriander as I roasted the whole spices and then ground them fine in the coffee grinder. (I have one dedicated for that purpose.) Having freshly ground spice blends is worth the minimal amount of effort it takes to grind them yourself.

Otherwise following the recipe, the soup was everything I wanted it to be: hearty, flavorful but not overpowering, and fragrant. The Indian spices perfectly complemented the sweet potato and the hint of bitterness in the Swiss chard gaves it a nice balance. Toor dal added a creamy texture to the soup without being mushy.

Plus the recipe made enough for this army of one-singular-sensation to have lunch and dinner for a several days. If CB and the Roommate are sweet, maybe I’ll share.

So let’s fortify ourselves, Gentle Readers, for the coming holidays with this delicious, satisfying, Indian-inspired soup. Cinnamon and peppermint will be scenting our dreams soon enough.

~~~~

If you fancied this recipe, you may take delight in:
~~~

Sweet Potato, Swiss Chard, and Toor Dal Soup
Serves 8


2 medium onions, chopped
1 1/2 tsp cumin seeds
1 tsp black mustard seeds
2 tsp canola oil
1 tbsp fresh ginger, grated
3 cloves garlic, minced
2 medium sweet potatoes, peeled and cut into 1-inch cubes
8 cups water
3 cups dried toor dal or yellow split peas, picked over and rinsed
1 tbsp mild curry powder (to taste)*
Salt to taste (optional)
1 bunch Swiss chard, washed, trimmed, and chopped

Note: Swiss chard stems are edible. They have a crunchy texture, like Romaine lettuce, and add a nice color contrast to the dish, whether you choose red, yellow, or white. When trimming Swiss chard, snip off any ends that are tough or dried out, but it’s not necessary de-stem like you would with kale or collard greens.

1) In a large saucepan or stock pot, heat 1 teaspoon canola oil and cook onions 5 minutes, stirring frequently, until translucent. Move onions aside in pot and add second teaspoon of oil and whole cumin and mustard seeds. Stir seeds with spatula for about 30 seconds.

2) When mustard seeds begin to pop, stir together spices with onions. Then add ginger and garlic and cook for about 1 minute.

3) Add water, sweet potato, toor dal, and curry powder and stir. Bring to boil, then reduce heat and simmer, covered, for about an hour or until the dal is tender.

4) In the meantime, wash and chop Swiss chard and set aside. Stir dal occassionally to prevent sticking and burning.

5) When the dal is tender, turn off heat, remove lid, and stir in Swiss chard. Replace lid and allow chard to wilt for 5–10 minutes.

6) Serve piping hot with crusty bread or naan and put off shopping for another day.

*Bonus Recipe:
Madhur Jaffrey’s Curry Powder
from World Vegetarian
Makes 5–6 tablespoons


2 tbsp whole coriander seeds
1 tbsp whole cumin seeds
2 tsp whole peppercorns
1 1/2 tsp whole brown mustard
1 tsp whole fenugreek seeds
5 to 6 whole cloves
3 dried chilies, crushed
1 1/2 tsp ground turmeric

1) Heat a small cast iron skillet over medium heat. Combine all whole spices in skillet and roast for 1–2 minutes until aromas begin to emerge, stirring or shaking the pan intermittently. Some spices will brown and change color.

2) Add ground turmeric and heat for another 10 seconds. Remove from heat and transfer mixture to a plate or bowl to cool.

3) Grind in spice or coffee grinder until mixture is as fine as possible. Store in an airtight container in a cool, dark place. Take a deep breath and smile.

Approximate Calories, Fat, Fiber, Protein, and Price per Serving
306 calories, 2.4g fat, 13g fiber, 18g protein, $.39

Calculations
2 medium onions: 80 calories, 0.4g fat, 0g fiber, 0g protein, $0.88
1 1/2 tsp whole cumin: negligible calories, fat, fiber, protein, $.02
1 tsp black mustard seeds: negligible calories, fat, fiber, protein, $.02
2 tsp canola oil: 79 calories, 9g fat, 0g fiber, 0g protein, $0.05
1 tbsp fresh ginger: 6 calories, 0g fat, 0g fiber, 0g protein, $0.06
3 cloves garlic: 12 calories, 0g fat, 0g fiber, 0g protein, $0.04
2 medium sweet potatoes: 112 calories, 0g fat, 4g fiber, 2g protein, $0.34
3 cups dried toor dal: 2109 calories, 9g fat, 92g fiber, 133.5g protein, $0.18
1 tbsp curry powder: negligible calories, fat, fiber, protein, $.02
Salt: negligible calories, fat, fiber, protein, $.02
1 bunch Swiss chard: 56 calories, 0g fat, 8g fiber, 8g protein, $1.50
TOTALS: 2454 calories, 19g fat, 104g fiber, 143.5g protein, $3.13
PER SERVING (TOTALS/8): 306 calories, 2.4g fat, 13g fiber, 18g protein, $.39

Rabu, 08 Desember 2010

Guest Post: Slow-Cooker Mexican Beans

Lorri Brown is a mom, writer, and avid Murder She Wrote fan, who lives far away in the Mountains of Western Maine with her four awesome kids and three cats. When she’s not working in public health, she writes for About.com and bunch of other fun sites. 

Greetings CHG readers! I am sooo excited about being a guest blogger while Kris moves! (I just moved to a new house, so I know how much work that is- bleck). Anyway, I’m here to share with you my super-easy slow cooker recipe for Mexican Beans.

By day I work in community health, in the Wilds of Western Maine, doing nutrition outreach (please note, I am not a dietician, nurse, or doctor- nor do I play any of these on TV). By night I am a single mother of four children ranging in ages 14 to 6. So, I like cheap, healthy, good and quick foods. Therefore, my slow cooker is my BFF.

This meal, adapted from an old family recipe, is easy-peasy to make and it goes a long, long way. I freeze leftover beans and use them in everything from scrambled egg breakfast burritos to a base for bean soup or chili. I’ve tried different variation of the recipe, but none satisfy me like the original version. In one case I thought I’d spice ‘em up with a little of Dave’s Insanity Hot Sauce- If you’ve never tried Dave’s – he’s not joking. One teaspoon of the hot sauce made two pounds of dried beans taste like you were eating molten lava. No one- not even my Middle Son who puts Tabasco sauce on everything- could eat them. I chalked that cooking experiment up as a valuable lesson learned.

If you aren’t familiar with the benefits of beans, here are a couple of quick facts: Beans are an excellent source of protein, containing 14-16grams per cup. They have approximately 1/3 the amount of protein of beef, without any of the fat or cholesterol. Beans are also a good source of fiber, potassium, magnesium, iron and folate. Okay, health lecture over, on to the recipe.

Slow Cooker Mexican Beans
Serving size – 1 cup of cooked beans
Makes 12 servings


 2 pounds (or 4 cups) of dried pinto beans
1 diced onion
½ a bottle (roughly 3 tablespoons) of cumin – it sounds like a lot, but this recipe makes a lot of beans!
1 Tbs. black pepper
1Tbs. garlic powder
1Tbs. onion powder
2 tsp. salt

1) Rinse beans and check for any stones.

2) Throw beans (no soaking required! Yay!) and onion into the crock pot and fill ¾ of the crock pot with water

3) Add all the spices

4) Set to low (8 hours)

5) Round up the kids and go to work. Come home to the fragrant smell of dinner already done!

Nutrition Facts:
I used Nutritionist Pro to calculate the nutrition info.
  • Calories- 224
  • Fat - .08 g
  • Sodium – 395 mg (16% DV)
  • Fiber – 10 g (40% DV)
  • Sugars – 2 g
  • Calcium – 76 mg (8% DV)
  • Iron – 3 mg (19 % DV)
  • Potassium – 895 mg (26% DV)
Cost per serving: $0.19
  • Bag of beans - $1.19
  • Onion - $0.50
  • Cumin - $0.50
  • Onion powder -$0.03
  • Garlic powder - $0.03
  • Salt - $0.03
  • Pepper - $0.03
Serving Suggestions
I like to serve the beans with a little bit of shredded cheddar cheese and a tortilla to dip into the broth. However, they would go great with salsa and guacamole. Of course, what doesn’t go great with guacamole? After a day or two in the fridge the beans thicken to a porridge-like consistency, good for quesadillas.

Things You Should Know
I’ll be honest- this is a trial and error recipe at first. You might have to up the amount of spices, depending on your tastes. But I always stick with the time-honored advice of you can put in more salt/pepper/cumin/whatever- but you can’t take it out.

Selasa, 07 Desember 2010

Happy Day! I'm featured on Two of my Favorite Foodie Sites!

I am so very excited to have been featured on two of my favorite foodie sites recently. I am relatively new at food blogging and am honored that my recipes and thoughts are finding their way into homes across the globe.

The first site I hope you find your way over to is Food with Kid Appeal. She featured my post "Simple Chilled Gazpacho, Give A Kid A Straw"  as part of her series on 'How to Get Your Kids to Eat Healthy Foods'. FwKA has been one of my favorite sites and resources since I started blogging. Jenna's blog is a wonderful resource for parents and caregivers who have picky eaters or just want to feed their family a variety of healthy foods.


I'm also thrilled to be on Hip Pressure Cooking.com  with my Sante Fe Style Stacked Enchiladas  recipe.
I love love love my Kuhn Rikon Swiss Pressure Cooker and use it several times a week for lightning speed dinners that lock in the nutrients and flavour of the food far better than traditional cooking. Hip Pressure Cooking is a very inspirational website for all things pressure cooker!

As I compile more recipes I hope to have a page dedicated to pressure cooking on Simply Healthy Family. I think everyone should own a pressure cooker, it's a busy mom's DREAM!

Thank you to everyone who reads my blog and leaves such sweet comments. I truly appreciate the time it takes to read, comment and hopefully try a recipe or two. I truly hope that more and more people will read this blog and be inspired to have a healthier home!


Happy Sharing!!!

Ask the Internet: Inexpensive Holiday Wines?

Greetings, sweet readers! Today's post comes from a CHG Facebook discussion a few weeks ago.

Q: With the holidays fast approaching, we'd all like to imbibe a bit. So, what are your favorite inexpensive wines?

A: While Trader Joe's house brand, good ol' Three Buck Chuck, is always a hit, Indaba's Sauvignon Blanc has really become a recent favorite. It's flavorful without hitting you over the head, and I can usually find it for around $8 a bottle.

Readers, what about you? Lettuce discuss some boozery.

Want to ask the interweb a question? Post one in the comment section, or write to Cheaphealthygood@gmail.com. Then, tune in next Tuesday for an answer/several answers from the good people of the World Wide Net.

Senin, 06 Desember 2010

Guest Post: Pressure Cooker Black Bean Soup Recipe

Joy Manning is senior recipes editor at TastingTable.com. She blogs at OysterEvangelist.com. She enjoys all things cheap, healthy and good from her home/office/test kitchen in South Philadelphia.

I may be five-years-married and in my early-middle 30s, but I am having a crazy hot love affair: 252 degrees Fahrenheit, to be exact. That’s the temperature at which water boils—way hotter than the usual 212—inside my pressure cooker.

Some pressure cooker enthusiasts are keen on the fact that things cook in about one-third of the usual time under pressure. True, but for me the allure lies in its ability to produce slow-cooked flavor in a hurry. The pressure cooker happens to work magic on some of the inexpensive ingredients we all know can be made to taste amazing over the course of an hours-long braise—dried beans, beets, cheaper cuts of meat like brisket and pork shoulder—in almost no time flat. And contemporary models are so tricked out with safety features, there is absolutely nothing to fear.

This recipe for black bean and chipotle soup hits the table in 45 minutes. And 30 of those minutes are completely inactive: While you wait for dinner, have a glass of wine and watch the Daily Show on DVR. It is the absolute best black bean soup I have ever made, not just because it uses 90 percent pantry staples or the fact that it’s vegan, but because the slow cooker manages to intensify and meld flavors better and faster than seems imaginable until you use one.

As kitchen gadgets go, pressure cookers are pretty inexpensive and they’re so great at dinner on the fly you’re bound to save a bundle on take out. Get yourself one, and start with this soup that I promise will become a staple:

~~~

If you like this recipe, you might also enjoy:
~~~

Black Bean and Chipotle Soup
Serves 4 to 6


1 tablespoon canola oil
1 medium onion, diced (about 1 cup)
2 medium celery stalks, diced (about ½ cup)
1 small carrot, diced (about ¼ cup)
1 tablespoon cumin
1 teaspoon salt
3 garlic cloves, minced
1½ cup dried black beans
8 cups cold water
1/2 to 1 cup raw cashews
1 cup boiling water
1 to 2 chipotle in adobo sauce(depending on your heat tolerance), plus 1 to 2 tablespoons adobo sauce
1 tablespoon tomato paste
Juice of ½ lime
¼ cup chopped cilantro

1) In a pressure cooker, combine the oil, onion, celery, carrot, cumin and salt and cook, stirring frequently, over medium-high heat until the vegetables soften, about 5 to 8 minutes. Add the garlic, and cook until fragrant, about 30 seconds.

2) Add the black beans and cold water and lock the lid shut. Bring to high pressure over high heat, and then, once high pressure is achieved, reduce your heat to medium, as low as you can while still maintaining a steady hiss from the pressure-release valve. Cook under pressure for 30 minutes. Use the quick-release button or allow the pressure to come down naturally.

3) Meanwhile, cover the cashews with the boiling water and allow to stand while the bean soup cooks. In a blender, combine the cashews in their soaking water, the chipotles and adobo sauce, the tomato paste and 1 ladle full of cooked beans from the pressure cooker. Blend on high until a smooth puree has formed, about 1 minute. Whisk this puree back into the soup.

4) Stir in the lime and cilantro and season with additional salt if necessary. Serve immediately, or freeze for up to three months.

Approximate Calories, Fat, Fiber, Protein, and Price Per Serving
Four servings: 438 calories, 14.2 g fat, 19 g fiber, 21.9 g protein, $1.13
Six servings: 292 calories, 9.4 g fat, 12.8 g fiber, 14.6 g protein, $0.80

Calculations
1 tablespoon canola oil: 124 calories, 14 g fat, 0 g fiber, 0 g protein, $0.08
1 medium onion, diced (about 1 cup): 46 calories, 0.1 g fat, 1.5 g fiber, 1 g protein, $0.25
2 medium celery stalks, diced (about ½ cup): 11 calories, 0.2 g fat, 1.3 g fiber, 0.6 g protein, $0.36
1 small carrot, diced (about ¼ cup): 25 calories, 0.1 g fat, 1.7 g fiber, 0.6 g protein, $0.10
1 tablespoon cumin: negligible calories, fat, fiber, and protein, $0.05
1 teaspoon salt: negligible calories, fat, fiber, and protein, $0.01
3 garlic cloves, minced: 13 calories, 0 g fat, 0.2 g fiber, 0.6 g protein, $0.18
1½ cup dried black beans: 1022 calories, 3.9 g fat, 67.3 g fiber, 68.6 g protein, $0.75
8 cups cold water: negligible calories, fat, fiber, and protein, FREE
1/2 to 1 cup raw cashews (calculations are for 3/4 cup): 470 calories, 37.3 g fat, 2.8 g fiber, 15.5 g protein, $1.95
1 cup boiling water: negligible calories, fat, fiber, and protein, FREE
1 to 2 chipotle in adobo sauce, plus 1 to 2 tablespoons adobo sauce: 20 calories, 1 g fat, 1 g fiber, 0 g protein, $0.37
1 tablespoon tomato paste: 13 calories, 0.1 g fat, 0.7 g fiber, 0.7 g protein, $0.05
Juice of ½ lime: 5 calories, 0 g fat, 0.1 g fiber, 0.1 g protein, $0.12
¼ cup chopped cilantro: 1 calories, 0 g fat, 0.1 g fiber, 0.1 g protein, $0.25
TOTAL: 1750 calories, 56.7 g fat, 76.7 g fiber, 87.7 g protein, $4.52
PER SERVING (TOTAL/4): 438 calories, 14.2 g fat, 19 g fiber, 21.9 g protein, $1.13
PER SERVING (TOTAL/6): 292 calories, 9.4 g fat, 12.8 g fiber, 14.6 g protein, $0.75