Would you believe me if I told you that this pizza was so fast and easy to make that you can do it on any day of the week? I did just to make sure it was as easy as it sounded, it is. I usually save pizza for the weekends and home made pizza for a day when I have plenty of time, patience and energy. Needless to say, we don't have home made pizza very often. That is until my sister gave me her recipe for this basic pizza dough. Now we can have fresh out of the oven pizza on any given Tuesday!
Preheat your oven to 425F. Place a pizza stone if using, in oven and sprinkle with cornmeal.
This dough is so easy I almost feel like I'm cheating. NO rising, No kneading and no waiting. Only a handful of ingredients and a stir of the spoon and you have home made pizza dough in under 10 minutes.
Separate the mixed dough into two equal parts {or shape into bread sticks!}.
On a silpat or wax paper, roll into a ball and press with your hands to make a circle. Finish rolling the dough out with a rolling pin until it's about 1/4" -1/2" thick.
Carefully, transfer dough to the hot pizza stone by flipping it over. Pushing the edges in if needed.
Cook the dough for 10-15 minutes till lightly golden brown but not done. Poking holes in any bubbles that may form.
Using an oven mitt, carefully pull oven rack out and spread pesto (or sauce of choice) over dough to 1/2" from the edge. Sprinkle with mozzarella, sun dried tomatoes and raw shrimp.
2 1/4 cup warm water 2 tsp. salt 2 1/2 tsp. sugar 4 1/2 Tbs. oil 2 tsp. dry yeast 5 2/3 cup flour
Mix salt, sugar, yeast and oil. Pour warm water over mix and stir. Add flour one cup at a time, mixing well each time, then kneed. No rising necessary. Bake 425 degrees 15-20 minutes.
Top with sauce and toppings, bake another 5-10 minutes until cheese melts and turns golden brown and shrimp is pink.
Probably one of the most favorite traditions in my family is Friday Pizza Night. Sometimes we go out to Mellow Mushroom were they have pizza's more to my liking, think goat cheese, sun dried tomato and artichoke hearts. Then the husband and kids can have their usual sausage and cheese pie. Did I mention the ice cold beer served to you while you wait for your pizza while watching the guys in the open kitchen toss huge pizza pies up into the air? Love pizza Fridays.
What's even better than going to a fun pizza joint for your favorite pizza? Making your own at home of course! Years ago when my oldest son who is now 19 (YIKES!) was little, we would make our own individual pizzas on toasted English muffins or French bread. It's still fun to do that with the little ones, they love picking ingredients from little bowls and making their very own little pizzas.
I saw this pizza bread on Pinterest and thought it was such a perfect idea. The only thing better than pizza is a cheese stuffed pizza bread you can dip into a bowl of warm marinara. Divine happiness I tell you. I was blown away at how incredibly simple this bread was to make and it turned out perfectly even though in my photographing I forgot to add the 'toppings' to the flour before mixing and so I ended up over kneading the dough.
It came together in about a minute using just a wooden spoon. No special equipment necessary.
Core Bamboo sent me some fun kitchen toys including a beautiful little modern mortar and pestle, a set of bamboo utensils and this gorgeous bread board. It turns out that it's one of those things I never knew I couldn't live without! (I can feel my husbands eyes rolling at me ;)
Not only is this bread board beautiful, I love bamboo and the clean lines,
it keeps my kitchen counters free of crumbs, score!
It also makes a lovely serving tray either on the removable lattice board
1 teaspoon yeast 3/4 cup warm water 1 2/3 cups all-purpose flour 1 teaspoon kosher salt 1 1/2 cups favorite toppings, chopped 8 oz. shredded mozzarella cheese
1/4 cup grated Parmesan Romano 1 tablespoon olive oil
Add yeast to warm water. Let it sit for 3 minutes until foamy, then add to flour and salt. Mix (using a mixer, spoon, or your hands) just until it comes together. Add in the toppings of your choice and combine. Dough will be tacky, but feel free to dust with a bit more extra flour if it feels too tacky. Cover with a tea towel and let rise in a warm place for about 1 hour, then put in the refrigerator for another hour.
Take the dough out of the refrigerator and flour a Silpat or waxed paper. Roll out into a rectangle about 11×17”. Sprinkle cheese onto the middle of the rectangle. Then fold over about 1" along the long side, like an envelope. Seal the other 3 sides so cheese is not exposed. Let rest while you preheat oven to 450 degrees. Place a pizza stone of you have one in oven and let oven stay at 450 degrees for 20 minutes.
Bake the bread, either on a pizza stone or baking sheet, for 25 to 30 minutes, until golden brown. About 3 minutes before taking it out, lightly brush the top with olive oil and let it finish baking. Let rest on a wire rack to cool slightly before slicing.
notes:
In order for the yeast to activate properly it can not be to hot or to cold. It should be warm enough if you sprinkle it on the inside of your wrist it is very warm but not hot. I add a pinch of sugar to the warm water and have found this helps activate the yeast.
I found that I needed to add quite a bit more flour than stated, at least 1/2 cup plus another 1/2 cup when kneading the final loaf.
I did not brush my bread with oil but next time I will as you can see it is a bit dry/flour-y.
One winner will win this pretty Lattice Bamboo Bread Board. Winners must reside in the U.S. or Canada. Good Luck!
It takes a good, solid year to get moved and settled into a new house. This, is a fact.... otherwise known as my opinion. We have been living in our current house AKA the crappy rental for almost a year and I finally found a good place to store the ginormous magnifying glass from Pottery Barn and hung the last 3 pictures in our bedroom. Mind you I have absolutely no idea where half of my belongings are. You see, part of the curse of being a procrastinator is that you wait until the day of moving to pack things that you never knew you even had in the first place. Things you never even used one single time like your kitchen scale which you have now decided that you can't live without.
Not worth killing yourself over a kitchen scale by climbing mountains of haphazardly stacked boxes topped with over sized Christmas wreaths and luggage. The arrangement my husband assured me was only temporary 10 months ago.
What is driving me batty is not remembering exactly what camping gear we do or do not have because when we lived in our old house we had 4 children, 3 of them under the age of 7 and 1 in diapers until after we moved. Not exactly the scenario I would paint for a fun camping trip. Wait. Did I just say camping could be fun? Well, we're going this weekend and have no idea where half our gear is.
Camping with 4 kids = Not always so much fun.
Simple home made pizza with negative zero guilt = My idea of fun!
Amen!
Believe me when I tell you that this pizza crust is delicious, thin and remarkable crispy yet slightly soft and chewy with notes of Italian herbs, spices and freshly grated Parmesan and mozzarella in every bite.
Your "dough" will be slightly crumbly but will hold together nicely by the egg and cheeses.
Mix the 'dough' together with your hands until combined then shape into a ball and place on a square of parchment paper. Using your hands, flatten out into a circle about 1/4" thick. The thicker you make it the longer it will take to cook. Look how nicely it forms.
While you are preparing the cauliflower 'dough' place a pizza stone (or baking sheet) in an oven pre-heated to 450F. on the lower rack.
Carefully slide the dough and parchment onto the pre-heated stone.
Bake 20-25 minutes until the crust is golden brown and crispy around the edges.
Remove stone from oven, place on a cooling rack and top with your choice of toppings! The possibilities are endless of course. I used one of my all time favorite combos, roasted garlic and prosciutto with fresh pizza sauce and lots of fresh Italian cheeses. I made the boys a cheeseburger pizza.
You Will Need:
1 medium sized cauliflower 1/4 cup mozzarella or Italian cheese blend plus more for topping if desired 1/4 cup Parmesan Cheese, freshly grated is best 1 jar prepared pizza sauce or home made (recipe below) 1 medium egg (Organic & free range of course :) 1/2 tablespoon dried oregano 1 teaspoon dried basil 1/2 teaspoon dried thyme 1 teaspoon garlic powder 1/2 teaspoon salt cracked black pepper or red pepper flakes to taste (I use 1/2 teaspoon red pepper flakes)
Toppings of your desire.
Wash cauliflower well and dry. Cut off leaves and stems. Break into florets.
Place into a large food processor (I don't have one, I used my Vitamix. If you do this I suggest putting in half at a time.) PULSE several times until you have a 'powdery' texture. Don't over blend, you'll have mush.
Scrape into a microwave safe bowl. Microwave for 2 minutes on regular power. (I've skipped this step before and it turned out fine, slightly soggier but fine) Carefully remove from microwave and let sit for a couple of minutes. Dump cauliflower onto the middle of a kitchen towel and fold lengthwise into thirds. Now, wring the heck out of it getting out as much liquid as you possibly can. I typically get just less than a cup! The more liquid you get out, the crispier your crust will be i.e. more toppings!
Place cauliflower back into bowl. add herbs, spices, salt and cheeses. Mix well with your hands. Now add egg. Mix to combine. Make into a ball and place onto a square of parchment paper. Using your hands, shape into a circle 1/4" thick.
Carefully slide the parchment paper and cauliflower crust onto your pre-heated stone. Bake at 450F for 20-25 minutes (checking after 15 minutes as oven times vary). When crust is golden brown and crispy around the edges remove from oven.
Top with your favorite pizza toppings and pop back into the oven for 5-10 minutes until warmed through.
Fresh herbs aren't easy to find or grow year round, even here in the desert. It gets so hot here during the summer that even the cactus start to look like they are going to give up and melt away by the end of August. It's difficult for me and my lack of a green thumb to keep plants alive indoors for any extended period of time, even ones as hardy as most herbs are. Right now is the time to plant many herbs and greens here in the Arizona desert even though the gardening season is coming to an end in most other regions. Just one more reason I love the Fall.
So since I adore cooking with my fresh herbs I needed to find a way to preserve them a bit longer. One way is by simply dropping a small handful of fresh herbs into a small bottle of olive oil and using as a salad dressing. Another way to keep fresh herbs around for cooking is by chopping them up and mixing them into softened butter and refrigerating or freezing for future use.
So make a big batch of fresh and creamy herbed butter and freeze in ice cube trays and you will have little herb balls of joy to throw into your saute pan whenever you want a fresh pop to your dish.
Make this herbed butter now and it would be perfect for a quick baste on your
Thanksgiving turkey, potatoes and other side dishes.
Start with fresh, creamy salted Organic butter. The salt will help preserve your herbs.
Let it sit on the counter for an hour or so until it softens.
Choose any selection of your favorite herbs. I went with an Italian theme this time.
In the bowl of your small food processor, combine softened butter and herbs. You can mix them up or just add one herb to each small batch of butter.
Pulse the butter until its smooth and creamy.
Using a small spoon, fill an ice cube tray with your herbed butter. I used small ice cube trays which hold about 1 teaspoon of butter. Then larger ice cube trays hold about a tablespoon. Cover with wax paper and freeze. If you are not going to use the butter within a short period of time I suggest taking the butter out of the freezer after a few hours and popping the frozen butter cubes into a freezer safe bag. They should keep in the freezer for months and in the fridge for several weeks.
When you are ready to use your butter simply add one of the cubes to your pan or baking dish and watch as the aromatic butter turns golden brown.
Fresh herbs really made this thinly sliced squash so aromatic and delicious.
For a different and healthy version of Friday Pizza night I made these stuffed baby portobello pizzas. Even the kids loved them since the were stuffed with Italian sausage two kinds of cheeses and fresh pizza sauce.
Use a wet cloth to clean your mushrooms. Don't rinse under the sink since mushrooms are like sponges and will absorb all of the water and become soggy while baking.
Using your fingers, pop out the stems.
I used a sweet Italian sausage for the kids but we prefer spicy Italian sausage. Simply brown the sausage in a skilled and spoon into your carved out mushrooms. Spoon on pizza sauce and sprinkle Italian cheeses such as mozzarella and Parmesan.
I use my baking stone which I looveee! It keeps oil locked in the pours of the stone so I don't need to brush my mushrooms with any additional oil. If you don't have one brush the tops of your mushrooms with a bit of oil. Put into a pre-heated oven at 400F. and bake for 20-25 minutes until the cheese is golden brown.
Serve these healthy little pizzas with your sauteed Italian squash and enjoy your weekend!
One of my family's favorite foods is pizza and one of my favorites is home made pizza. You just can't beat a good home cooked pizza on a pizza stone. The fresh dough and fresh ingredients of your choosing. I like to get crazy with my pizza and put stuff like eggplant and goat cheese on it but the kids have a slightly less exotic palate.
This pizza incorporated another of our family's favorite cuisines, Mexican food. The roast was slow cooked in pineapple juice making it sheer torture waiting for it to be done while whiffs of warm pineapple floated around the house.
Serve with an ice cold tropical margarita if your feeling festive.
The meat is moist and will make your dough soggy if you don't pre-cook it, so pop the dough onto your hot pizza stone, brush with a bit of good olive oil and bake at 400F for about 10 minutes. Remove from oven and then put your toppings on.
Topped simply with shredded Jack cheese and slices of sweet peppers this pizza was very satisfying.
I seem to have started quite a stir when I posted my shredded chicken tip last year. I had several people asked me if it worked with beef and sure enough it does! Again, just make sure you are using very warm or hot meat and trim as much fat from the roast as you can. If you use cold meat it can quite possibley harm your mixer, my Aunts Bosch mixer broke when we tried to shred a cold pork roast for tamales last year.
Hot pineapple roast in......................................
2 1/4 cup warm water 2 tsp. salt 2 1/2 tsp. sugar 4 1/2 Tbs. oil 2 tsp. dry yeast 5 2/3 cup flour Mis salt, sugar, yeast and oil. Pour warm water over mix and stir. Add flour one cup at a time, mixing well each time, then kneed. No rising necessary. Bake 425 degrees 15-20 minutes.
Pineapple Carnitas Pizza Recipe PREP TIME 30 MINUTES COOK TIME 45 Ingredients
2 teaspoons chili powder
1 teaspoon cumin
1 teaspoon kosher salt
3-4lbs. chuck roast
2 tablespoons canola oil
2 - 12oz. cans pineapple, papaya or mango juice (I use leftover canned pineapple juice from our cottage cheese and pineapple snack)
1 recipe for pizza dough
olive oil, for brushing the dough
1 cup jarred tomatillo salsa, plus more for serving
12 ounces fresh jack cheese, shredded
1 yellow onion, thinly sliced and sauteed until golden
1 cup of sliced sweet or bell pepper
sour cream, for serving (optional)
guacamole, for serving (optional)
Instructions
Preheat oven to 300 degrees.
Mix the chili powder, cumin and salt in a small bowl.
Rub the spice mixture on both sides of the roast.
Heat the canola oil in a large pot over high heat, then sear both sides of the roast until nice and brown, about 2 minutes per side.
Pour the juice into the pot with the meat.
Cover and roast for about 4 hours, until falling apart.
During the last 30 minutes of cooking, put your pizza stone if you have one it the oven.
Put hot roast in your mixer with the cookie paddle attatched and blend on speed 4 till shredded. Or use 2 forks to shred the meat then return to the juices.
Add tomatillo salsa and onions to the shredded roast, mix to combine.
Turn up the heat in your oven to 400F
Roll out pizza dough into a circle
Fold dough in half and gently transfer to your hot pizza stone, brush with a bit of olive oil.
Cook dough for 8-10 minutes so it will not soak up all of the juices from the meat.
Remove from oven and spread the shredded roast all over pizza
Top with shredded Jack cheese and peppers.
Bake pizza for 12-15 minutes until crust is browned and cheese is melted.
Just like you, sometimes I struggle with this. What keeps me going is how good I feel from where I was when I was injured. I have worked too hard to fix myself to ever give up on me…that is MOTIVATION! I have progressed to modified workouts instead of straight up physical therapy and believe me I still throw in a bit of the PT just to keep me honest. As I have shared and you know how I feel…Life is too short not to be my BEST ME…so even on those days that feel hard and hand me a “I do not want to attitude ”…I DO IT. That inner voice talks pretty loud, and on those days, I truly feel like I am having an out of body experience going through my workout…but…the important thing is…I AM DOING IT.
Off topic, but not really…I came down with the bronchial flu…a not so fabulous share from hubby that has set me back going on 2 weeks of no workouts…YUCK YUCK YUCK…I would love to say more about how frustrating this makes me feel. Why do I share this…hmmm…well, I write what pops into my mind and I am relating this to motivation because I am motivated to get back on track once my energy is where it should be. I am no super human and this past week has definitely proved that, but boy am I determined and motivated to get back to it. You see, my lifestyle motivates me…I miss my workouts, even on the hard days. There is a saying that goes…”You regret those things you do not do”…Well, I know that if I do not maintain my physical fitness, my body will suffer the consequences.
I Want a Long Healthy Happy Active Life with Hubby
I have so many motivators in my life…My Faith in God…this is HUGE…I have respect for this gift of life in this body and it is up to me to take the BEST care of ME always…One Life, One Chance, No Rewinds…WOW…this gives me goose bumps. My fabulous husband motivates me to take care of ME, to be my BEST ME for him…crap, I want to feel sexy, alive, and all those things not only for myself, but for him. We have a common goal of living a long, happy, healthy and active life together. My children motivate me…WOW…I have 4 now and I want to be my BEST for them, spending time, having laughs, watching their lives unfold as they journey into adulthood…they are already there…AMAZING! My Grandchild and future grandchildren are motivators…how cool it will be to be a fit and trendy Grandma…I want that for them…I want to be able to sit, play and move around with ease and scoop them up in my arms with confidence and strength. My parents and family motivate me…I want to be a healthy example for them, to enjoy the wisdom of my parents, and share in the lives of my siblings; My friends motivate me…you know in this life, seriously, true friendship is a rare gift and I cherish a couple that I can call my gems in life…a chosen sisterhood.
My clients and those I touch on a daily basis to live healthy lives motivate me. I receive emails of gratitude and celebrate success stories everyday…and you know what…I am just the voice to provide the MOTIVATION…truly it is each person that has to make a personal choice to change…and when this happens, that is exciting and MOTIVATING for me personally. Wrapping this up, I am a collector of motivational posters and sayings and I share this information on my Stay Healthy Facebook page on a daily basis. I get so excited with a new find and how it moves me to be a better person and I think…if it speaks like this to me, then I am definitely going to share it. I began a Pinterest account…OH MY…this is absolutely the BEST place to find motivational posters on every topic under the sun…no kidding…check out my board specific to MOTIVATIONS!
This blog has been a bit everywhere in my life, but when it comes to Motivation, it is such a grand word, and even more than that, it is one to think about deeply. So….does feeling sexy in my clothes MOTIVATE me…a big YES, but it goes much more beyond that and each day could bring a different motivator, but overall…I am Motivated to be a healthy person…and I am Motivated to Motivate…Can I say that…does that make sense…I hope so.
My Workout of the Day:
Recovery Period: Recovering for 2 weeks from the flu…not happy but necessary to prevent relapse
I don't know why I still sometimes think that making good, home made breads has to be difficult. After all, I am known for preaching about how simple it is to make home made snacks and meals so why not breads? I still find myself searching high and low on the bread aisle for healthy and affordable breads, usually to no avail. About half way down the list of ingredients I give up and say " Well, at least there's not any High Fructose Corn Syrup in here." even if I have no idea what the last 10 ingredients are. I have found 2 excellent bread recipes that I stick to when I have the courage time and patience to make bread. I don't know what my hang up is..... previous life baking disaster maybe? Luckily, I do have my trusty 'Go To' sandwich bread recipe which is super easy is this Honey Oat Bread I've made this rustic Rosemary Filone Bread many times as the perfect accompaniment to soups or panini's and this Cinnamon Spice Bread is one of our all time favorites and perfect for Fall.
Make sure to check out these simple bread recipes and please keep in mind that I've been making them for so long that they were some of the very first recipes I posted here on Simply Healthy Family so the pictures leave much to be desired. I must retake some decent ones.... some day.
There. Disclaimer complete. Onto my latest 'Go To' bread find. Super simple and amazing Rosemary Flat bread. These flat breads take all of about 20 minutes total to make and are perfect as individual pizzas, to serve with a chopped salad such as my this one, which is why I started the search for the perfect flat bread in the first place.
I would be ever so grateful if you would stop by and Tweet or share my recipe. The voting on the top 2 finalists starts next week. Thanks again for all of your support!
So, my search for a quick and delicious flat bread recipe that would come out slightly crispy and 'rustic' led me to this recipe on Smitten Kitchen which was originally from July 2008 Gourmet magazine, can't go wrong there. I adapted it by using less oil in the dough, more rosemary and instead of brushing them with more oil I used a roasted garlic spread then made it into a pizza by sprinkling with Parmesan and sliced veggies. That's it. Simple.
I'm thinking I will make these with roasted eggplant and feta next time. What do you think you would put on them or serve them with?
I doubled this recipe.
TIME 20 MINUTES YIELDS 4
You will need:
1 3/4 cups unbleached all-purpose flour 1/3 cup extra virgin olive oil + 1 teaspoon 3 tablespoon chopped rosemary 1 teaspoon baking powder 3/4 teaspoon salt 1/2 cup water
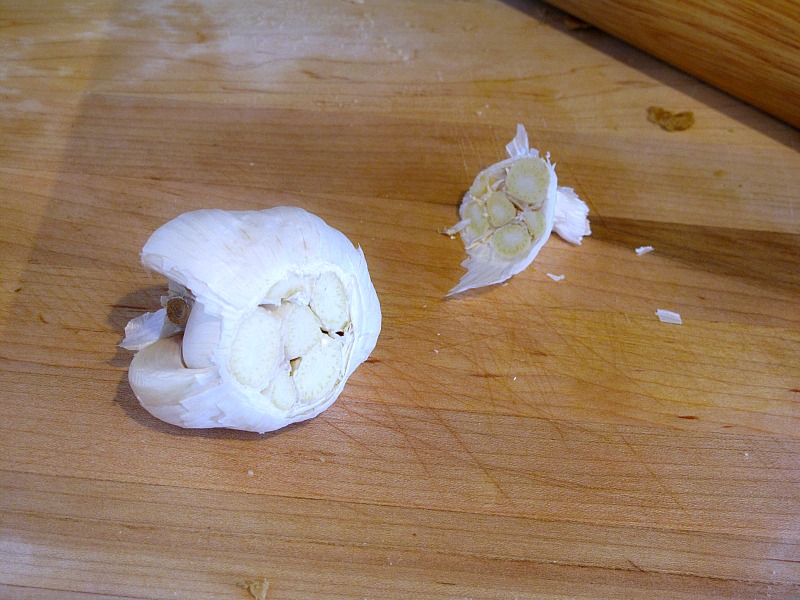
Preheat oven to 400°F with a baking stone on the middle rack. Slice the top 1/4 inch off of a head of garlic and drizzle with a teaspoon of olive oil. Place on a baking stone (you will need the pre-heated stone for the pizzas). Roast the garlic for about 20 minutes, remove from heat and let cool so you can handle it.
Meanwhile.... Stir together flour, chopped rosemary, baking powder, and salt in a medium bowl. Make a well in center, then add water and oil and gradually stir into flour with a wooden spoon until a dough forms. Knead dough gently on a work surface 4 or 5 times. Divide dough into 3 pieces and roll out 1 piece (keep remaining pieces covered with plastic wrap) onto a lightly floured work surface into 8 inch rounds (shape can be rustic; dough should be thin).
Using your fingers, gently pop the cloves of garlic out of the skin and put into a small food processor. Add a dash of salt and a bit more oil if needed. Pulse until smooth. Using a brush, spread garlic onto flat breads. Sprinkle with freshly grated parmesan cheese and top with thinly sliced tomatoes and zucchini. Slide pizzas onto preheated baking stone and bake until pale golden and browned in spots, 8 to 10 minutes. Transfer pizzas to a rack to cool.
Mix your 3 dry ingredients and chopped rosemary in a medium bowl.
Add water and oil and stir
Divide into 4 equal size pieces and flatten out with your hand then a rolling pin.
Mean while, you will want to roast your garlic. Simple cut off a bit of the top, drizzle a tiny bit of olive oil onto exposed garlic head and put onto a baking sheet and into a preheated oven at 400F for about 20 minutes.
Voila! Deliciously sweet roasted garlic.
Put into a small food processor {I love my new manual one from P.C.} Drizzle about a teaspoon of olive oil and a dash of sea salt into processor and pulse till blended. You can never, EVER have to much garlic IMHO.
Brush the tops of each flat bread with your garlic spread
Sprinkle with shredded Parmesan and keep an eye out for sneaky baby fingers! Top with your veggies of choice and bake as directed above.
Bon Apetite!
I'm thinking I will make these with roasted eggplant and feta next time. What do you think you would put on them


 which I looveee! It keeps oil locked in the pours of the stone so I don't need to brush my mushrooms with any additional oil. If you don't have one brush the tops of your mushrooms with a bit of oil. Put into a pre-heated oven at 400F. and bake for 20-25 minutes until the cheese is golden brown.